Building My Personal Blog Using Notion and Cloudflare Pages (for free)
How I built my personal blog using Notion as a CMS, Astro for the frontend, and Cloudflare for hosting - all without spending a dollar. This post covers the architecture, tooling choices, and workflows behind a clean, maintainable, content-first blog setup.
One of my New Year resolutions this year was to finally start a personal blog, something I’ve been meaning to do for a long time. The goal is simple - publish at least one article every month.
Since I use Notion for pretty much everything, from quick notes to tracking finances, it felt like the obvious choice for writing my blog posts.
However, there was a catch. Using a custom domain with Notion costs $10/month per domain, even if you’re already on a paid plan. That didn’t sit right with me.
So instead of paying for it, I decided to D-I-Y it.
My 3 Hard Requirements
Before building anything, I set a few non-negotiable constraints for myself:
-
Notion must be the CMS
Writing should happen where I already spend most of my time.
-
Zero hosting cost
This is a personal blog and I didn’t want recurring bills.
-
No Markdown sprawl in GitHub
I didn’t want a repository cluttered with hundreds of generated Markdown files just to publish content.
Architecture
Frontend
For the frontend, I’m using Astro. It’s a great fit for content-heavy websites like blogs and documentation. Astro has native support for Markdown and MDX, which aligns perfectly with a writing-first workflow.
Astro also uses file-based routing, so each page maps directly to a file. This makes the project structure intuitive, easy to navigate, and simple to maintain as the site grows.
One feature I found especially powerful is Astro Content Collections. My blog posts pages are based on this feature only. The posts or mdx files don’t live in the same repository as the frontend instead, they’re pulled in and materialised at build time. This keeps the frontend repo clean while still giving me full type safety, validation, and structure. I’ll dive deeper into this setup later in the post.
Relevant code snippet for blog post collection -
// External content directory from env, falls back to local blog folder
const contentDir = process.env.CONTENT_DIR || './src/content/blog';
console.log('[Content Config] Loading from:', contentDir);

const blog = defineCollection({
    loader: glob({
        pattern: '**/*.{md,mdx}',
        base: contentDir
    }),
    schema: z.object({
        title: z.string(),
        slug: z.string().optional(),
        description: z.string().optional(),
        type: z.string().optional(),
        last_edited: z.string().optional(),
        tags: z.array(z.string()).optional(),
    }),
});
Notion Page Structure
I am using a Notion database (table) as the single source of truth for all my blog posts. Each row in the table represents one blog post, and every row has its own dedicated subpage that contains the actual content.
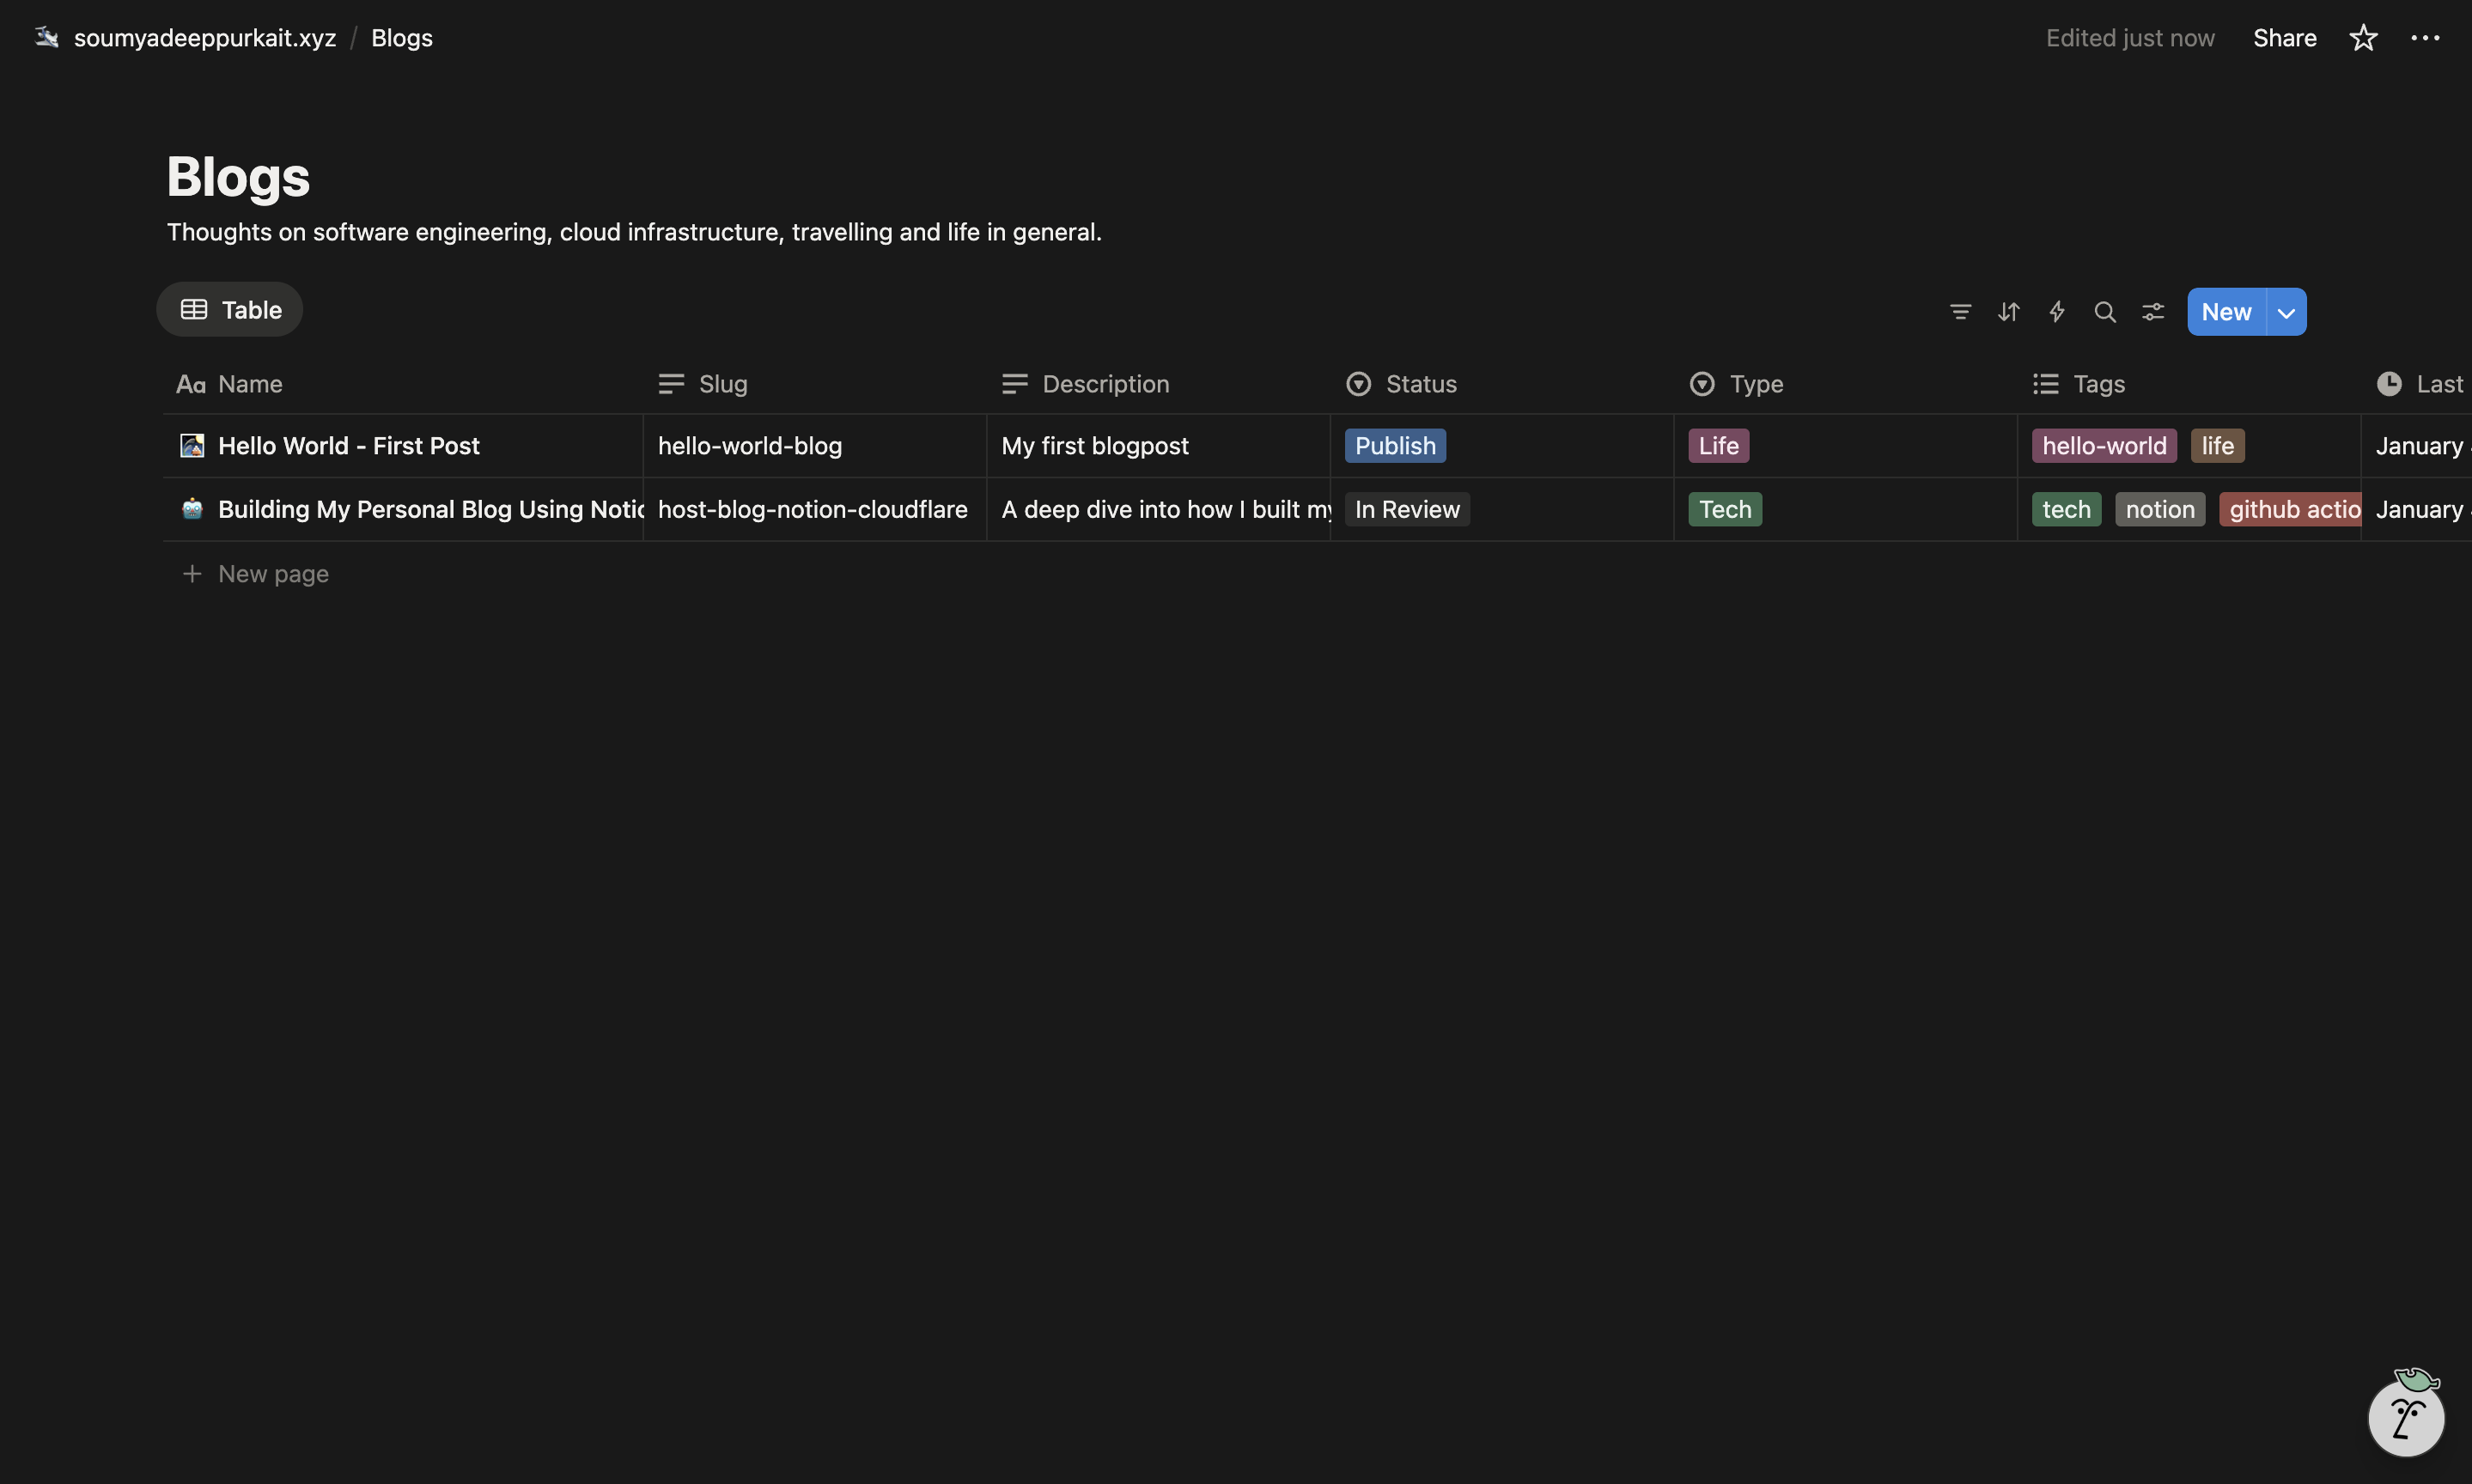
The table columns act as the post’s schema, mirroring what the frontend expects (as seen in the code above). This keeps metadata structured and predictable.
Publishing is controlled via a simple Status column. A blog post is included in the build only when its status is set to Publish, making it easy to publish or unpublish posts without touching any code.
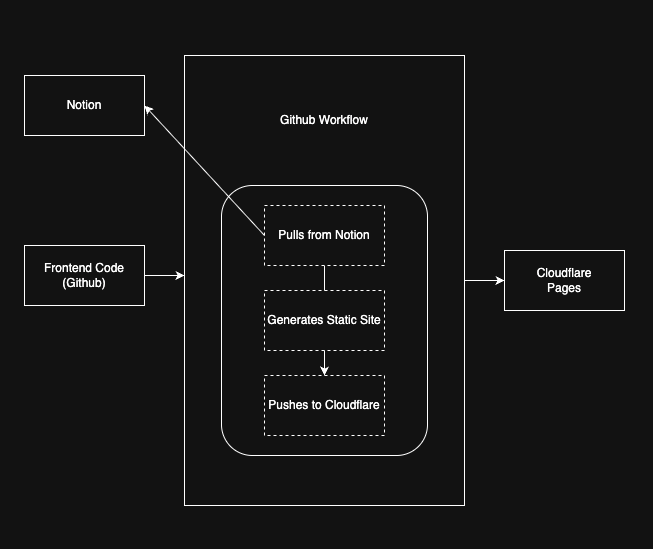
Github Action Workflow (real magic happens here)
This was my first time using GitHub Actions. I’ve worked with multiple CI/CD tools before and have used Jenkins extensively in work over the last five years, but GitHub Actions stood out as the simplest and most intuitive of them all.
It offers a lot out of the box, things that usually require significant setup and maintenance in other CI/CD systems. The tight integration with GitHub, sensible defaults, and minimal configuration make it especially enjoyable to work with.
If I ever had to choose a CI/CD tool for my own company, GitHub Actions would be my first choice without hesitation.
Now, coming back to my blog, here is the Github Action Workflow which I am using -
name: Deploy to Cloudflare Pages

on:
  workflow_dispatch:
    inputs:
      environment:
        description: "Environment to deploy to"
        type: choice
        options:
          - PROD
        default: "PROD"
      dry_run:
        description: "Dry run?"
        type: boolean
        default: true

jobs:
  deploy:
    runs-on: ubuntu-latest
    environment: ${{ inputs.environment }}
    name: Deploy
    steps:
      - uses: actions/checkout@v4

      - name: Setup Node.js
        uses: actions/setup-node@v4
        with:
          node-version: 18
          cache: 'npm'

      - name: Install dependencies
        run: npm ci

      - name: Checkout notion-to-mdx-scripts
        uses: actions/checkout@v4
        with:
          repository: neelneelpurk/notion-to-mdx-scripts
          ref: main
          path: notion-to-mdx-scripts

      - name: Install uv
        uses: astral-sh/setup-uv@v3

      - name: Set up Python
        run: uv python install 3.12

      - name: Run notion-to-mdx-scripts
        run: |
          cd notion-to-mdx-scripts
          uv run main.py
        env:
          OUTPUT_DIR: "./output"
          NOTION_API_KEY: ${{ secrets.NOTION_API_KEY }}
          BLOG_DATASOURCE_ID: ${{ secrets.BLOG_DATASOURCE_ID }}

      - name: Build
        run: npm run build
        env:
          CONTENT_DIR: "./notion-to-mdx-scripts/output"
          DOMAIN_NAME: ${{ vars.DOMAIN_NAME }}

      - name: Deploy to Cloudflare Pages
        if: ${{ !inputs.dry_run }}
        uses: cloudflare/wrangler-action@v3
        with:
          apiToken: ${{ secrets.CLOUDFLARE_API_TOKEN }}
          accountId: ${{ secrets.CLOUDFLARE_ACCOUNT_ID }}
          command: pages deploy dist --project-name=${{ secrets.CLOUDFLARE_PROJECT_NAME }} --commit-dirty=true
In short, this workflow pulls content from Notion via the Notion API, converts published posts into MDX, and injects them into the Astro build at build time. If the run isn’t marked as a dry run, the generated site is then deployed to Cloudflare Pages.
Notion Page Converter Script
Most of the heavy lifting is done by the notion-to-mdx-scripts repository. This script is responsible for fetching content from Notion and handling the MDX conversion. I’ve open-sourced it, but it currently works with a hardcoded table schema, specifically the one described earlier in this post. Making it more generic is something I plan to work on in the future.
One detail worth calling out is the use of environment variables. The script outputs generated MDX files to OUTPUT_DIR which is set to ./output. During the Astro build step, this same directory is passed in as CONTENT_DIR and is set to ./notion-to-mdx-scripts/output. As mentioned in the frontend section, CONTENT_DIR is what Astro uses to locate and load blog posts at build time.
Why Cloudflare Page over Netlify or Vercel?
To be clear, I could have used Netlify or Vercel and ended up with a similar result—both are excellent platforms for hosting static sites.
I chose Cloudflare Pages because its free tier felt more forgiving for a personal project, with fewer practical constraints for day-to-day use. What really sealed the decision, though, was Cloudflare R2. The free tier includes 10 GB of object storage, which is more than enough for hosting images and other static assets for a personal blog. It also provides unlimited free egress. Having storage and hosting within the same ecosystem made the overall setup feel simpler and more cohesive.
The final reason was familiarity and curiosity. I already use Cloudflare extensively at work, but I’d never had the chance to properly explore Pages and Workers. This project felt like the perfect opportunity to do that in a real-world setup.
Caveats & Limitations
-
Media handling
I intentionally don’t bundle images or videos into the static site. As a result, any image or video directly uploaded to a Notion page will not be picked up during the build. Instead, images are hosted in a public Cloudflare R2 bucket and videos are hosted on YouTube, then embedded into Notion pages. This keeps the build lightweight and avoids bloating the frontend output.
-
Manual publishing flow
The blog is not automatically synced with Notion. Every content update requires manually triggering the GitHub Actions workflow. I considered using a scheduled (cron-based) workflow but chose not to, to keep deployments explicit and under control. This limitation exists because Notion’s outgoing webhooks don’t support authentication. A clean solution would be to place a Cloudflare Workers layer between Notion and GitHub Actions to securely trigger builds. That’s something I plan to add in a future iteration.